
Simple Methods For Food Preservation: Canning Tips
Preserving food doesn't have to be a time-consuming chore. In fact, it can actually become an enjoyable hobby that pays off in flavorful dividends! Imagine opening your pantry and seeing jars of vibrant, homemade jams, tangy pickles, and perfectly preserved fruits - all from your very own kitchen. Intrigued? Then you've come to the right place! Our post titled "Simple methods for food preservation: canning tips" is designed precisely for novices who want to start their journey into the world of home preservation but are unsure where or how exactly they should begin. We will demystify this age-old practice by offering straightforward steps highlighting everything you need about conserving foods through canning techniques. This simple skill not only helps reduce waste but also allows enjoying seasonal produce year-round while being fully aware of what's in your meals - no hidden additives or preservatives! Dive deep with us as we seal fresh flavours within glass confines!
Understanding the Basics of Canning
Understanding the basics of canning can be the first step towards ensuring food safety and extending the shelf life of fruits, vegetables, and even meats. The process involves sealing food in airtight containers and heating them at high temperatures to kill bacteria and other microorganisms. First, it is essential to select fresh, high-quality produce and thoroughly wash and prepare it. Next, sterilize jars and lids by boiling them or using a dishwasher. Once the food is cooked or blanched, pack it tightly into jars, leaving appropriate headspace. Apply lids and process the jars in either a water bath canner or a pressure canner, depending on the acidity level of the food being canned. After processing, allow the jars to cool completely before checking for proper seals and storing them in a cool, dark place.
Selecting and Preparing Your Food for Canning
Selecting and preparing your food for canning is a crucial step in the preservation process. When choosing which foods to can, opt for a fresh, high-quality product that is at its peak ripeness. This ensures the best flavour and texture in your canned goods. It is important to thoroughly wash and clean your fruits and vegetables before canning to remove any dirt, debris, or pesticides. Additionally, trim off any bruised or damaged areas. For low-acid foods like meats and vegetables, it is essential to use a pressure canner to eliminate the risk of bacterial growth. Follow proper canning techniques such as using approved recipes, sterilizing jars and lids, and ensuring proper sealing and processing times. By carefully selecting and preparing your food for canning, you can enjoy delicious preserved foods all year round.
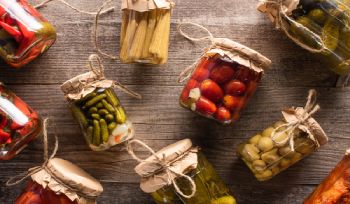
Types of Cans and Jars: Which to Choose?
When it comes to food preservation, choosing the right type of cans and jars is crucial. There are various options available, each with its own benefits and uses. Glass jars, for example, are ideal for preserving jams, jellies, and pickles as they maintain the food's colour and flavour while allowing you to see the contents. Mason jars are a popular choice, known for their durability and compatibility with canning equipment. On the other hand, metal cans are best suited for high-acid foods such as tomatoes, as they prevent any reaction between the food and the container. They are also convenient for long-term storage due to their airtight seal. Whichever type you choose, ensure that they are properly sterilized and in good condition to guarantee successful food preservation.
Step-by-Step Guide to the Process of Canning
Canning is a widely used method for preserving food, ensuring its longevity and allowing you to enjoy seasonal produce all year round. If you're new to canning, it may seem like a daunting task, but with a step-by-step guide, the process becomes much more approachable. Step 1: Gather the necessary equipment. You'll need canning jars with lids and bands, a large pot or canner, a jar lifter, a canning funnel, a bubble remover, and a non-metallic spatula. It's important to ensure that all your equipment is clean and in good condition before you begin. Step 2: Prepare your produce. Wash and trim the fruits or vegetables you plan to can, removing any damaged or bruised areas. It's important to follow a tested recipe to ensure safety and quality, as some foods may require blanching or other preparation methods. Step 3: Fill the jars. Using your canning funnel, pack the prepared produce tightly into the jars, leaving the recommended headspace specified in your recipe. Use the bubble remover or non-metallic spatula to remove any air bubbles trapped in the jar. Step 4: Apply the lids and bands. Wipe the rims of the jars with a clean damp cloth to remove any residue that could prevent a proper seal. Place the lids on top of each jar and screw on the bands until fingertip tight. Step 5: Process the jars. Using a jar lifter, carefully place the filled jars into the canner, ensuring they are completely submerged in water. Process according to the recommended time and temperature specified in your recipe. Step 6: Remove and cool the jars. Once the processing time is complete, carefully remove the jars from the canner using a jar lifter. Place them on a towel-lined surface and allow them to cool undisturbed for 12 to 24 hours. Step 7: Test the seals and store them. After cooling, check that the lids are properly sealed by pressing down on the centre of each lid. If it doesn't flex or make a popping sound, it is sealed. Store the properly sealed jars in a cool, dark place for up to a year. Following this step-by-step guide will ensure that your canning process is successful, allowing you to enjoy the flavours of fresh produce long after the harvest season has ended. Remember to always use tested recipes and proper canning techniques to ensure the safety and quality of your preserved foods.
Recent Posts